Blackberry Blend Kirim Pesan BBM Lewat PC dan Tablet

. 25 September 2014
0 Comments

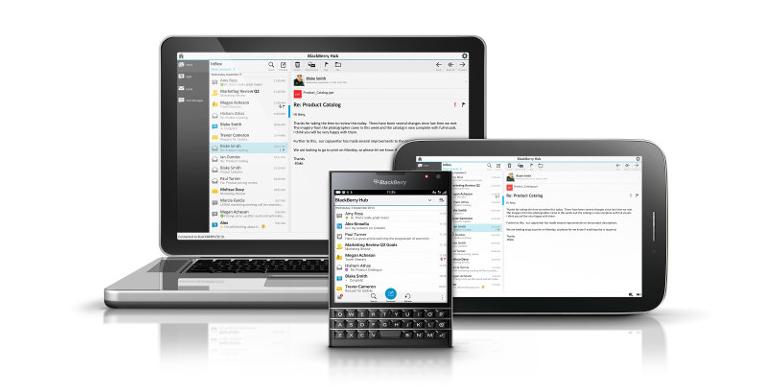
LONDON, Bersama dengan Passport, BlackBerry turut memperkenalkan layanan baru bernama BlackBerry Blend. Layanan berbentuk aplikasi yang bisa diunduh secara gratis ini mengintegrasikan ponsel BlackBerry dengan aneka perangkat lain, termasuk tablet Android, iPad, serta komputer berbasis Windows dan Mac. 

Pengguna BlackBerry bisa memanfaatkan Blend untuk membaca dan membalas pesan singkat BlackBerry Messenger (BBM) serta SMS yang diterima lewat ponsel BlackBerry. Demikian pula dengan daftar kontak, email, dan jadwal di kalender ponsel, semuanya bisa diakses dari gadget lain atau PC. 

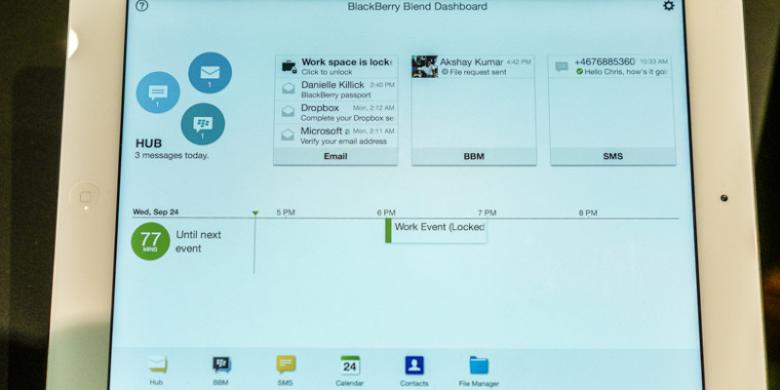
Demonstrasi penggunaan Blend di iPad.

“Dengan Blend, Anda mendapatkan informasi paling kredibel secara real time, tak peduli perangkat apapun yang Anda pakai. Kami percaya Blend akan mengubah cara Anda bekerja di berbagai macam perangkat,” ujar Direktur Handheld Software BlackBerry, Michael Clewley, dalam acara peluncuran BlackBerry passport di London, Inggris, Rabu (24/9/2014). 

BlackBerry Blend bisa digunakan di komputer yang menjalankan Windows 7/ Mac OS X 10.7 atau yang lebih baru, serta tablet Android 4.4 Kitkat dan iPad dengan iOS 7 ke atas. 

Versi Blend untuk komputer sudah bisa diunduh di tautan berikut, sementara versi untuk tablet telah tersedia di toko aplikasi masing-masing platform. Ke depannya, pihak BlackBerry berencana menambahkan fitur baru ke dalam Blend, seperti kemampuan menjawab panggilan telepon dari komputer. 
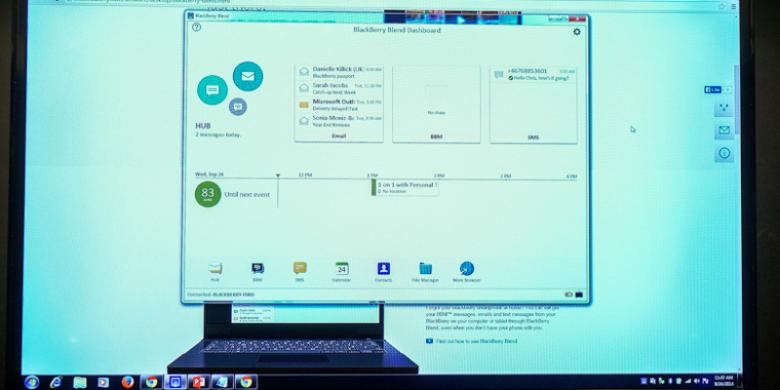
Demonstrasi menjalankan Blend di PC dengan sistem operasi Windows. 

Source: Kompas Techno

Read More..

Toshiba Satellite C40-a Checking Media Fail

. 11 June 2014
0 Comments

Kali ini laptop merek Toshiba tidak bisa booting melalui CD/DVD dan flash disk. Tepatnya Toshiba Satelite C40-A, dengan pesan Media Check: Fail“, mungkin juga ditemukan hal yang sama pada laptop merek Toshiba tipe lainnya. Setelah Googling ada salah satu solusi yang mudah, yaitu dengan mematikan fitur Secure Boot dan mengganti Boot Mode menjadi CSM Boot, berikut Langkahnya.

  1. Masuk ke BIOS dengan meneken tombol F2.
  2. Pilih tab Security, pada pilihan Secure Boot, ubah menjadi disable.
  3. Kemudian pilih tab Advanced, pilih System Configuration, pilih Boot Mode, ubah dari UEFI Boot menjadi CSM Boot.
  4. Keluar dan simpan konfigurasi dengan menekan F10, Yes.
  5. Silahkan coba booting.


    SeMoga Membantu

Read More..

USB Tray Icon Missing / recover lost or missing system tray icon

. 14 May 2013
0 Comments

1. Back up the Registry by creating a restore point.
2. Go to Start > Run (or Windows-key + R), type in regedit and hit OK.
3. Navigate to the key HKEY_CURRENT_USER\Software\Software\Microsoft\Windows\CurrentVersion\Explorer\TrayNotify.
4. Delete the values IconStreams and PastIconsStream.
5. Open up the Task Manager (Ctrl + Shift + Esc), go to the Processes tab, select explorer.exe and click End Process.
6. Open the Applications tab and click New Task at the bottom-right of the window.
7. In the message box that pops up type in explorer.exe and hit OK.
8. Explorer.exe will reload, and the missing icons should now be back in the system-tray where they belong.
9. Then if the volume bar isn't there, go to taskbar properties (where the volume was gray) and simply tick the box.

this should work, did for me!

Read More..

Flashdisk Tidak Terbaca di Komputer | USB Best Storage

. 09 August 2011
1 Comments


Flashdisk Tidak Terbaca di Komputer | USB Best Storage – Pernahkah anda mengalami kerusakan USB Flashdisk ? Seperti flashdisk terdeteksi namun ketika di klik drive flashdisk tersebut muncul tulisan Insert Disk (Please Insert a Disk Into Drive x :) seperti gambar berikut.


Kejadian ini menimpa saya ketika beberapa waktu yang lalu dan sedikit pusing untuk memperbaikinya. Masalahnya adalah flashdisk tersebut tidak bermasalah dengan device/driver dan timbul drive flashdisk tersebut di My Computer. Namun ketika di klik akan timbul pesan Please Insert a Disk seperti gambar di atas.

Dengan bermodalkan searching di google maka di dapatkan beberapa alternatif yaitu :

Memformat hardisk -> Klik Kanan Drive Flashdisk dan Format atau bisa juga lewat Command Prompt dengan perintah : format [driveflasdisk]:

Cara ini tidak berhasil karena drive Flashdisk tidak terdeteksi.
Partisi ulang drive Flashdisk -> klik kanan drive flashdisk, klik manage.

Kemudian klik kanan removable drive partition flashdisk tersebut dan klik Change Drive Letter and Paths.

Cara ini juga tidak berhasil

Pernah juga coba dengan software tool usb untuk HP (nama toolnya lupa) namun tak jua membuahkan hasil dan pesan error juga tetap muncul di flashd
isk.

Akhirnya dapat juga software untuk memperbaiki flashdisk rusak tersebut, nama softwarenya Super Stick Recovery ToolsV1.0.2.19.


Cara kerjanya juga cukup mudah

download softwarenya Super Stick Recovery ToolsV1.0.2.19
Colokkan flashdisk
Jalankan software maka akan lansung mendeteksi device driver usb flashdisk
Selanjutnya klik Update.
Tunggu proses penggantian drivernya selesai dan flashdisk bisa digunakan kembali.

Notes : Tool ini pernah saya coba untuk 2 jenis flashdisk yaitu Kingston dan USB best Storage. Untuk jenis yang lain belum dicoba. Tool ini juga sepertinya tidak mampu untuk memperbaiki flashdisk yang mati total.

Read More..

How to use the Out of Office Assistant in Outlook

. 10 March 2011
0 Comments

This article describes how to use the Out of Office Assistant in Microsoft Outlook.

Note that the Out of Office Assistant is only available if you have the Microsoft Exchange Server service in your profile.

This section covers the following topics:

* How to turn on the Out of Office Assistant
* How to create a rule
* How to delete a rule
* How to edit a rule
* How to change the order in which rules are applied
* How to turn a rule on or off
* How rules are applied

How to Turn On the Out of Office Assistant
For Microsoft Outlook 2010:

1. Click the File tab, and then click the Info tab in the menu.
2. Click Automatic Replies (out of office).
3. In the Out of Office Assistant dialog box, select the Send Automatic Replies check box.
4. If you want to specify a set time and date range, select the Only send during this time range check box, set the Start time, and then set the End time.
5. In the Inside my organization tab, type the message that you want to send within your organization, and in the Outside my organization tab, type the message that you want to send outside your organization.
6. Click Apply.

For Microsoft Office Outlook 2007 and earlier versions:

1. On the Tools menu, click Out of Office Assistant.
2. In the Out of Office Assistant dialog box, click I am currently Out of the Office.
3. In the AutoReply only once to each sender with the following text box, type the message that you want to send while you are out of the office.

How to Create a Rule
For Outlook 2010:

1. Click the File tab, and then click the Info tab in the menu.
2. Click Automatic Replies (out of office).
3. In the Out of Office Assistant dialog box, click Rules, and then click Add Rules.
4. In the When a message arrives that meets the following conditions box, specify the conditions that you want the message to meet.
5. Select the Do not process subsequent rules check box to specify that this rule must be the last one that is applied.
6. To specify more conditions, click Advanced, select the options that you want, and then clickOK.
7. In the Perform these actions box, select the options that you want.

For Outlook 2007 and earlier verions:

1. On the Tools menu, click Out of Office Assistant.
2. In the Out of Office Assistant dialog box, click Add Rule.
3. In the When a message arrives that meets the following conditions box, specify the conditions that you want the message to meet.
4. Click to select the Do not process subsequent rules check box to specify that this rule must be the last one applied.
5. To specify more conditions, click Advanced, select the options that you want, and then click OK.
6. In the Perform these actions box, select the options that you want.

How to Delete a Rule
For Outlook 2010:

1. Click the File tab, and then click the Info tab in the menu.
2. Click Automatic Replies (out of office).
3. In the Out of Office Assistant dialog box, click Rules, and then click Add Rules.
4. In the These rules will be applied to incoming messages while you are out of the office list, click the rule that you want to delete.
5. Click Delete Rule, and then click Yes.

For Outlook 2007 or earlier versions:

1. On the Tools menu, click Out of Office Assistant.
2. In the These rules will be applied to incoming messages while you are out of the office box, click the rule that you want to delete.
3. Click Delete Rule, and then click Yes.

How to Edit a Rule
For Outlook 2010:

1. Click the File tab, and then click the Info tab in the menu.
2. Click Automatic Replies (out of office).
3. In the Out of Office Assistant dialog box, click Rules.
4. In the These rules will be applied to incoming messages while you are out of the office list, click the rule that you want to edit.
5. Click Edit Rule, and then click Yes.
6. Make changes to the conditions and actions for the rule.

For Outlook 2007 and earlier version:

1. On the Tools menu, click Out of Office Assistant.
2. In the These rules will be applied to incoming messages while you are out of the office box, click the rule that you want to edit, and then click Edit Rule.
3. Make changes to the conditions and actions for the rule.

How to Change the Order in Which Rules are Applied
For Outlook 2010:

1. Click File tab, and then click the Info tab in the menu.
2. Click Automatic Replies (out of office).
3. In the Out of Office Assistant dialog box, click Rules.
4. In the These rules will be applied to incoming messages while you are out of the office list, click the rule that you want to move up or down in the list.
5. Click Move Up or Move Down.

For Outlook 2007 and earlier versions:

1. On the Tools menu, click Out of Office Assistant.
2. In the These rules will be applied to incoming messages while you are out of the office box, click the rule that you want to move up or down in the list.
3. Click Move Up or Move Down.

How to Turn a Rule On or Off
For Outlook 2010:

1. Click the File tab, and then click the Info tab in the menu.
2. Click Automatic Replies (out of office).
3. In the Out of Office Assistant dialog box, click Rules.
4. In the These rules will be applied to incoming messages while you are out of the office list, click to select or click to clear the check box next to the rule that you want to turn on or off.

For Outlook 2007 and earlier versions:

1. On the Tools menu, click Out of Office Assistant.
2. In the These rules will be applied to incoming messages while you are out of the office box, click to select or click to clear the check box next to the rule that you want to turn on or off.

How Rules Are Applied
Rules are applied in the order in which they appear, going from top to bottom, in the list of rules in the Out of Office Assistant box.

If you select more than one condition in the Edit Rule box, only messages that meet all of the conditions have the rule applied to them. For example, if you specify "Bob Green" as the sender (condition), and "Marketing Meeting" (condition) in the Subject box, the rule only applies to messages that meet both conditions.

If you set multiple conditions in one rule, messages that meet any of the conditions in the rule are found. For example, if you specify "Bob Green; Jeffrey Weems," in the From box, the rule applies to messages from either Bob Green or Jeffrey Weems.

To specify that a rule must be the last one applied, click to select the Do not process subsequent rules check box (in the Add Rule or Edit Rule dialog box).

When you specify an action for a rule and the action cannot be performed, an error message appears with an "X" next to the rule. To fix the error, click Edit Rule, and then make any necessary changes.

Read More..

Make Out of Office Assistant in Outlook Express

.
0 Comments

The Out Of Office Assistant is not available in Outlook Express. You may be able to duplicate its functionality by applying message rules.

The Out of Office Assistant is a feature of Microsoft Outlook that enables you to automatically reply to e-mail messages from people who send you mail when you are not available. Outlook Express does not have this functionality. To simulate the functionality of an Out of Office Assistant in Outlook Express you must first create an out of office message, and then an out of office rule. Additionally, it is important to remember that this function only works while Outlook Express is running and logged on to the e-mail server.
How to Create an Out of Office Message

1. Start Outlook Express.
2. Click File, New, and then click Mail Message.
3. Type the message that you want to use as an out of office message, click File, and then click Save As.
4. Enter a name for the mail message in the File name box, select the folder that you want to save the mail message in, and then click Save.
5. Close the message and proceed to the steps to create the out of office rule.

How to Create an Out of Office Rule

1. Start Outlook Express.
2. On the Tools menu, point to Message Rules, and then click Mail.
3. Click New.
4. In the Select the Conditions for your rule dialog box, click to select the For All Messages check box.
5. In the Select the Actions for your rule dialog box, click to select the Reply with Message check box.
6. In the Rule Description dialog box, click Message.
7. In the Open dialog box, locate the file that you named in the "How to Create an Out of Office Message" section, click the file, and then click Open.
8. In the Name of the Rule dialog box, name the rule, and then click OK.
9. Click OK to close the Message Rules dialog box.

To test your rule, send yourself a message from a different e-mail account. Rules are not applied to mail that you send to yourself in the same e-mail account when you use Outlook Express.

Read More..

Menampilkan kembali Folder Option yang hilang di Windows Explorer

. 24 February 2011
0 Comments

Folder Option berguna untuk konfigurasi folder termasuk menampilkan/menyembunyikan hidden folder.
Byasana folder option tiba2 hilang bisa disebabkan oleh virus ato tidak sengaja salah setting,
Untuk menampilkan kembali Folder Option, bisa diikuti langkah2 berikut:

1. Tutuplah semua program yang sedang dijalankan, agar tidak mengganggu proses group policy.

2. Klik Start kemudian run, atau bisa juga tekan tombol windows+R, tulis gpedit.msc lalu enter.

3. Setelah muncul jendela group policy pilih user configuration –> administrative templates -> windows component.

4. Pada Windows Component, buka folder Windows Explorer, double klik pada “Remove the folder options menu item from the tool menu”

5. Berilah tanda ceklist pada disable atau not configure, kemudian klik apply.

Sekarang periksa kembali windows explorer, cek pada menu tool, dan item folder options yang hilang akan muncul lagi.

atau

Langkah 1
Bersihkan virus pada komputer anda dengan antivirus yang tidak bervirus

setelah komputer anda bersih dari virus ikuti langka 2

Langkah 2
masuk regedit dengan cara klik start – run dan ketik regedit
akhiri dengan tekan Enter selanjutnya tekan pada keyboard Ctrl-F atau dari menu klik Edit – Find
maka akan muncul tabel pencarian/find berikut :

Langkah 3

ketikkan kata yang akan dicari yaitu NoFolderOptions (bisa diketik dengan hurus kecil semua) pada Find What dan klik Find Next cari data sampai menemukan data seperti berikut :

Langkah 4

Klik kanan pada NoFolderOptions dan pilih Modify kemudian ganti value data 1 menjadi 0 dan tekan OK sehingga datanya akan berubah menjadi seperti gambar berikut :

Langkah 5

Tutup regedit dan coba jalankan Windows Explorer, bila belum muncul juga Folder Options maka restart komputer anda dan coba sekali lagi buka Folder Options pada Windows Explorer.

Read More..